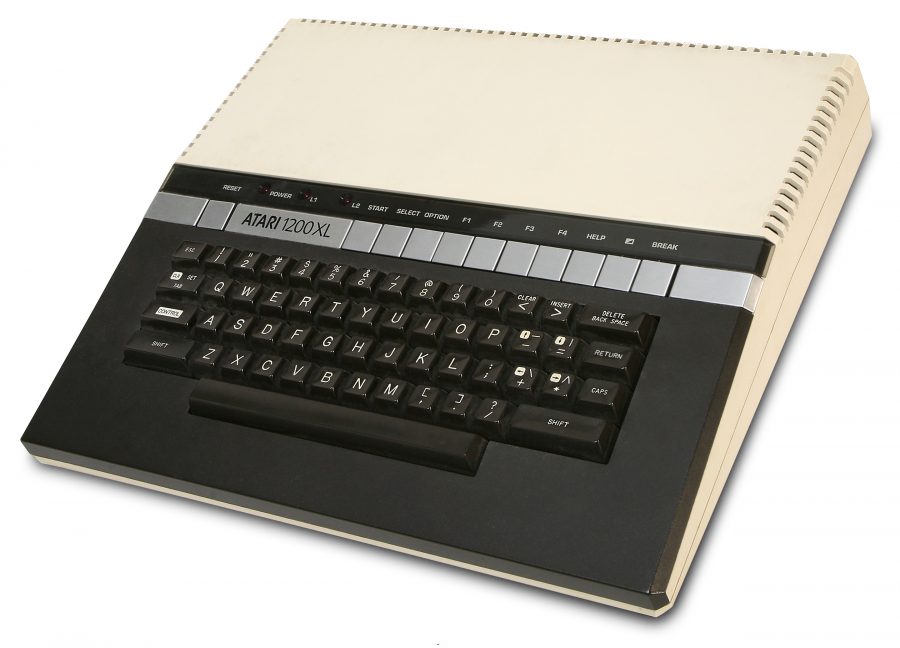
While the Atari 800 is generally known as the “hot one” of the Atari 8-bit line, the Atari 1200XL is almost always considered the one with the best keyboard in function, if not in reliability. After liquidating most of my collection, the Atari 800, Atari 1200XL, and Atari 800XE were the three Atari 8-bits I decided to keep for various reasons. Of the three, I considered the 1200XL the workhorse due to its various upgrades, including ClearPic2002 video, R63 resistor for SIO, 28 pin EPROM OS motherboard, and an OS with two switch selectable operating systems, 800XL and Omniview+40/80 column text mode, for maximum compatibility.
Now, when I originally procured this particular Atari 1200XL – incidentally because another Atari 1200XL I had had a non-functioning keyboard – everything worked perfectly, including the keyboard. According to the seller, “I overhauled and rebuilt the conductive mylar traces on the keyboard PCB and the keyboard is 100% working like new. All keys work, all the time!”. This was true up until I tried to use it again early last week after a few years of inactivity.
Unlike with my previous Atari 1200XL, I wasn’t ready to easily give up on this model. I researched keyboard fixes, since I was aware of them and just never got around to bothering with the other 1200XL. This link and this video were the two best how-to’s I found.
After removing three sets of screws, the first set from the case, the second set from the physical keyboard, and the third – and most numerous – set from the mylar that attaches to the keyboard, I began the cleaning process. Using various cleaning solutions, including Deoxit and its variants, I began the process of trying to re-trace the weakened circuits with conductive pens.
With that out of the way, I went to scraping the detritus from the contacts on the circuit board where the mylar circuits meet the physical part of the keyboard. For whatever reason, this was caked with what may or may not have been solder. It took a while to scrape off what I could – and I did put some fine scratches on the gold contacts – but I deemed it good enough.
Long story short, despite repeated cycles of this process and the frustration of trying to line up the mylar, etc., I could never get all keys on the keyboard to work. I figured the existing mylar was too warped and damaged. Enter Best Electronics.
Despite having a Website that would have been considered out-of-date in the late 90s, I’ve had good results with ordering stuff from them in the past (the hardest part is usually finding anything on their Website). After sending an email to ask about ordering and a little more back and forth, I ended up paying nearly $50 between the shipping and my preferred use of Paypal. Not cheap, but cheaper than replacing my unit, and potentially more-than-worth-it for a lasting fix. Yesterday, the package arrived.

Note the old mylar on the keyboard circuit board and the new mylar at the upper left of the desk. Note also all the screws in the upper right of the desk.
I once again disassembled the Atari 1200XL and cleaned the circuit board contacts again. I applied the mylar, including the small PCB that goes between the mylar and the keyboard circuit board. This is further compressed for a better connection by a small piece of sticky foam on the non-conductive side of the mylar.
After a few false starts where not everything seemed to work, I eventually scraped off a bit more hard gunk between the first and second traces that might have been creating a bridge or other issues, and tried it again. The last try worked.
Obviously, I didn’t document the entire process each step of the way, but I thought at least giving an overview of what I went through after the fact might help someone else when they come across an Atari 1200XL with a poor or non-functioning keyboard. Definitely try fixing the existing mylar first, but if that fails, know that the Best Electronics solution – while arguably a bit pricey – is a viable answer. Fingers crossed it proves a permanent solution.


 Your total news and information resource for all things Science, Technology, Engineering / Mathematics, Art, and Medicine / Health.
1 Comment
Leave your reply.