Commodore’s SX-64 was an ahead-of-its-time, transportable color computer based around the core technology in the legendary Commodore 64 (book). Unfortunately, the SX-64’s external keyboard is notoriously failure prone. In fact, of the two keyboards I have, one is completely dead and one barely registers a key press (and in fact lately appears to have stuck key signals, so it’s even worse). Sadly, replacement keyboards are incredibly difficult to find and often involves buying another complete system, which, if you’ve shopped for SX-64’s of late, you know is not cheap. Fortunately, I did find one solution to many an SX-64 owner’s dilemma, and that’s an offering from Jim Brain at Retro Innovations.

Retro Innovations Adapter

How the SX-64 is supposed to look.
Although the options are a bit confusing, if you go here, you can select the SX64 to/from PC option. My selected configuration was as follows: (Configuration: SX64 to/from PC, Joyport Sockets: No, Assembled? Yes). After about a month, I received my assembled board, which was ready-to-go.
The design is simple enough. You take your SX-64 keyboard cable, plug that into the SX-64 as usual, then plug the other end into the slot on this device. You then plug a PS/2 compatible keyboard with a Mini-DIN6 plug into the PS/2 port on the device. At least that’s the theory.
Unfortunately, it appears that the standard SX-64 cable does not fit into the connector on the board (I tried both of mine), which I confirmed with Jim Brain via email (I wish he had made that known on the Website or even in our prior email exchanges). Although he recommended just using a regular DB25 cable (which it turns out is recommended on his other site), all of my DB25’s didn’t fit either. My only choice was to snip away the plastic on the SX-64 keyboard cable connector end, which you can see in the photo.

Ugly snipping, but it now fits.
As you can also see in the photo, my snipping handiwork with my Xuron 170-II Micro-Shear Flush Cutters was not great (I had to be particularly careful to not snip any pins!), but it gave me an excuse to order some files to fix it up later (they should also be good for helping to beautify a modification I made to the removable lid on one of my Coleco Adams).

How it all connects.
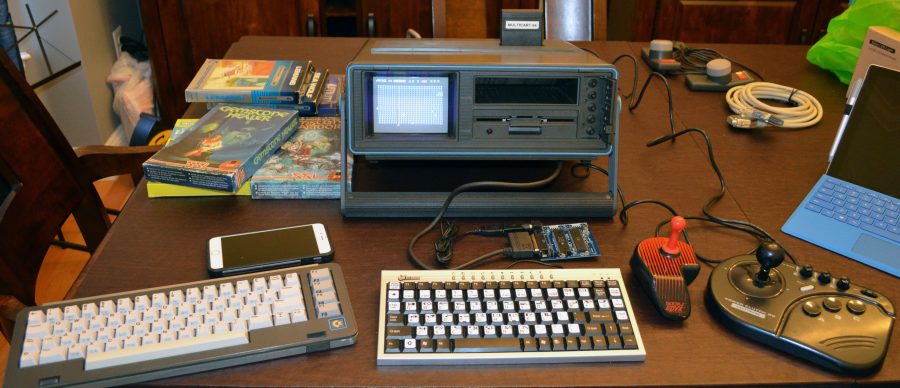
Anyway, for the replacement keyboard, I used a small form factor PS/2 keyboard from MCSaite I got for use with the MCC-216, complete with separately purchased keyboard stickers that go over the PC keys so they match their equivalent C-64 keyboard functions. All told, it’s not a bad way of working on a Commodore (although a quirk of this keyboard is that I have to manually turn off the Num Lock, which is on by default after startup), plus, because this keyboard also works over USB, I can use it with a regular PC emulator (I also tested old Dell and Microsoft full-sized PS/2 keyboard that worked just fine as well). Since this is actually my first time setting up the stickers, I do note that there does not appear to be an equivalent to the C-64’s [ and : combo key, as well as Restore. It was the same on all of the keyboards I tried.

I tried different keyboards.

Another angle.
I do also have to note that this setup failed to work at first, even after many hours of troubleshooting. After some back and forth emails with Jim Brain, he directed me to the product’s Website, where I was able to see what the jumper settings should be. It turns out I received the unit with J5 jumpered incorrectly. Once I fixed that, everything worked exactly as it should. On the plus side, in theory I also have the jumper settings there to configure this for use with my C-128DCR in case I ever need to use a different keyboard with that (fortunately, its original keyboard is in perfect working order as of now). I’ll just need to supply my own compatible DB-25 cable.

The original SX-64 keyboard (left) and my cheap sticker keyboard (right).
While this is not my ideal solution for Commodore’s transportable – I’d much rather have a working original keyboard – this does allow me to actually use one of my two SX-64s (of course one works better than the other), where before, it was beyond frustrating (and eventually, unusable). It’s not a cheap offering (and having to modify one of my original cables was particularly annoying), but it’s something that should last and has the benefit of working with more keyboard types should the need arise (NOTE: If you have a spare C-64 or VIC-20 keyboard lying around, this may very well be an even better solution).

The 64JPX Red.
I also tried out Nicholas Coplin’s 64JPX (JoyPad eXpander) Red for Commodore and Atari Computers and Consoles. The color designation indicates its compatibility, with the red allowing Sega Genesis or Mega Drive controllers to work more safely with older systems like the SX-64.
Interestingly, the 64JPX also offers other enhancements, like auto-fire, racing mode (use buttons instead of up/down, which is often used for accelerating and braking on one button systems), waddle mode (sports game left/right waddle simulation, e.g., when you need to move the joystick really fast left and right to run) and creep mode (platform or run-n-gun movement slow-down, e.g., when you need to position yourself perfectly on a platform, you can use the B button to “creep” left or the C button to “creep” right, the equivalent of a light tap on the joystick). Accessing one of these modes is simple. Press Start, then A, B, or C, as indicated in the PDF manual for the respective desired mode, then press Start again.

The 64JPX in action.
In my testing with both an original Sega Genesis gamepad and an Asciiware third party joystick, everything worked as expected. However, it’s important to note that this only worked in joystick port 1 on my SX-64, and caused stray characters to appear on the screen when plugged into port 2. So if you plan on using this with an SX-64, I’d probably steer clear. Nevertheless, while I’ve never personally had an issue with using Sega Genesis controllers directly on my older systems, there are enough reports of blown joystick connectors out there to make me reconsider my cavalier attitude towards it. I’m glad to have the 64JPX for use with my other 8-bit systems.


 Your total news and information resource for all things Science, Technology, Engineering / Mathematics, Art, and Medicine / Health.
9 Comments
Leave your reply.