In my prior first look, unboxing, and initial setup of the incredibly versatile ZMorph 2.0 SX Full Set, I got the essentials out of the way. Now it’s time to get down to more serious business and start to actually put this incredible tool to use. I’ll start off with reviewing the most basic features of the unit, which in this case is singlehead 3D printing, and eventually make my way in future installments through dualhead 3D printing, CNC routing, laser engraving, and thick paste extrusion, although not necessarily in that order. Since the 1.75mm singlehead plastic extruder is pre-installed and is something I’m already well-versed in from the use of other 3D printers, it makes for an ideal starting point for this first review of many for the ZMorph 2.0 SX.
All non-SLS/SLA 3D printers support PLA filament. Some printers, like the ZMorph 2.0 SX, not only support PLA, but also other, more difficult to work with materials like ABS, PVA, and HIPS, which is of course made possible by its inclusion of a heated print bed. For the purposes of this review, however, I’ll be focusing on use of one of the two included PLA filaments, Yellow and Dark Blue. I chose the former, although for fans of Dark Blue you’ll be happy to know that that color will make an appearance in the future dualhead review.
An important note about this review is that I’m writing this more or less as I work my way through initial use of the printer, which means there were plenty of issues to overcome along the way. So think of this as a journey as much as a review. If you prefer not to follow along on the whole journey, which gets into quite a bit of detail in terms of issues and challenges, feel free to skip ahead to the Troubleshooting section to see what a properly configured ZMorph 2.0 SX can actually do. That section is followed by the Optimal Setup and Final Results section, which takes all of the lessons learned and comes up with a best practices for initial setup, and is followed by the Conclusion. Spoiler alert: Everything worked out well in the end.
Since this a continuation of a previous blog post, I’ll continue to follow the instructions in the Knowledge Base, starting in Section 2, 3D Printing. The primary instructions were here, but I’ll summarize below.
Getting Started
I turned the printer on. On the printer’s touchscreen I selected the “Astronaut_175_FP.gcode for 1.75 Plastic Extruder and DualPro Extruder” sample file. Next on the touchscreen I selected my material, “Preheat PLA.”

The touchscreen indicating the glass print bed is heating. Since this is PLA, objects can be printed directly onto the glass bed with no need for Buildtak, which, if you recall, is included.
Next up is installation of the filament spool holder, which goes on the right side of the machine. I went to the included toolbox and located what looked like the spool holder bag. I then located the bag with the Allen wrenches.
For this part, I was a bit confused, but eventually figured out that unlike the animation, the spool holder already has the screw installed in it, and I just had to use a nut and washer on the other side.
I then opened up my Yellow PLA filament spool, but couldn’t figure out how to get the top spool holder to grip. I then re-read the instructions on the Knowledge Base and saw that it said “bottom rollers,” which meant I had to install another bottom roller on the right side of the machine.
It doesn’t seem to roll as smoothly as I would expect, but maybe that’s intentional. I put the Allen wrench back in its bag and the other three rollers (which go on the left side of the machine for dual extrusion, which again, is a future article) and washers and nuts back in theirs.
The next step was to take the tip of the filament (carefully snipped, of course, with cutting pliers (not included) so it’s a straight tip) and slide it through the PTFE guide tube until it reaches the drive gear of the extruder. Unfortunately, I saw no PTFE guide tube, so I borrowed one from the Dual Pro extruder box. Maybe that’s where it is when you have a unit that ships with the Dual Pro?
I actually had some trouble getting the PLA to catch in the extruder, but once it did, the Yellow eventually flowed out like it was supposed to. I also adjusted the PTFE guide tube a bit. I wasn’t sure if the flow was going to stop on its own or not, so I just exited out of the process on the touchscreen.

Since it was so long between heating of the bed, I ran through the file and heating process again. I then selected Print.
Unfortunately, the filament wasn’t feeding well the first time. After a few more tries, I was finally able to get it to properly pull the filament.
The other issue I noticed was that it wasn’t printing right on the left side, so I stopped the print so I could do a bed level. This unit is pre-leveled prior to shipment, but, as we saw with the snapped velcro, shifting can happen, so it was clear a calibration was needed.
Calibrating the Printer
To level the bed, I followed the instructions here, which involved using the Touch Probe add-on from the toolbox.

Then I had to attach the touch probe when instructed by the touchscreen. Like a lot of the components of the ZMorph, the touch probe uses powerful magnets to lock into place.

One of the screws in question. The other three screws are on the bed itself and can be adjusted with the included screwdriver.
Having previously used a more consumer friendly printer with auto bed calibration, this semi-manual process was a bit frustrating, although not nearly as frustrating as the fully manual process that some printers require (aka, the slip of paper method, which you can also do here should you be so motivated). Still, having to estimate degrees and then run the calibration process over and over again was fairly annoying, although you can stop once the values for each screw are less than 10 degrees.
I must admit that on one level the calibration process was actually somewhat enjoyable. On another, I still definitely wish there was a way for it to have a completely automatic process. Nevertheless, I do think this is a reasonable process overall, all things considered, especially since it’s not something I should have to do much.
So, with calibration out of the way, I tried to print again.
First Test Print
It was bit noisier printing than I’m used to compared to some lower end printers I’m experienced with, but it wasn’t necessarily significantly louder (plus, there’s a few Quiet Mode options in the settings that I didn’t try). Unfortunately, my first test print, which only took about 1 hour and 40 minutes, although looking good at first, was not good upon closer inspection.
I re-ran the calibration, which showed my bed was off again. And in fact, I had to run calibration many times more to get it right. Once I did, I tried printing again.
Since it was still not the quality it was supposed to be, plus it stuck to the bed oddly, I wondered if there was something I was missing. Looking at “fan adjustments” elsewhere in the Knowledge Base, I saw that they want PLA prints with the cover open (something not mentioned in the quick start). So perhaps it was too hot inside?
Printing from SD Card
In the toolbox was an SD card (specifically a 2GB microSD card in a full-size adapter) that fits into the slot on the right side of the touchscreen. This is a blank card.
I started up Voxelizer and registered on www.designfutures.club, which is a ZMorph-centered model repository, so I’d be logged into the software. With that out of the way, I downloaded a model from Thingiverse for testing. In this case, it was a Pug, which I already printed on the New Matter MOD-t, so I could use it as a point of comparison.
In the Voxelizer software I processed the STL file and created GCODE, which I exported to the SD card. I then plugged this SD card into the slot and accessed the file from the touchscreen for printing. I then printed the same way as the astronaut file.
The model did stick on the bad rather aggressively, though, which did require a lot of force, so I did end up having to re-level the bed again. And again, and again, and again, etc., but I just couldn’t get it right. Ugh!
In fact, after many hours of trying to level the bed, I isolated the issue to a problem with the UP/DOWN thumb screw (z axis). The shaft of the screw appears to be a bit warped (it’s a bit angled) and the spring slipped past the top washer. I finally disassembled it and put it back together, placing it again where it’s supposed to be. Despite having to run the bed leveling many more times, I finally hit upon the elusive combination of thumb screw twists to get a good reading.
I ran another astronaut print to join his five other brethren just to make sure everything was OK.

Yep, another astronaut, and about the same quality as the last two, although I do think the visor ridge came out better this time. Unfortunately, this one had an overly stuck brim, so I couldn’t easily peel it off. In other words, I’d consider this only a partial success.
Printing from Voxelizer
To print directly from the Voxelizer software, I needed to hook up the USB cable. I followed the instructions here.
Interestingly, when I connected the printer, its internal memory showed up as a drive letter on my Windows 10 desktop. That’s the same internal memory that has the sample astronaut file on it.
The Voxelizer software also noted there was a firmware upgrade available, which allowed for nice fixes and feature updates. I rebooted the printer as instructed (pressing the button by the red X below the touch panel).
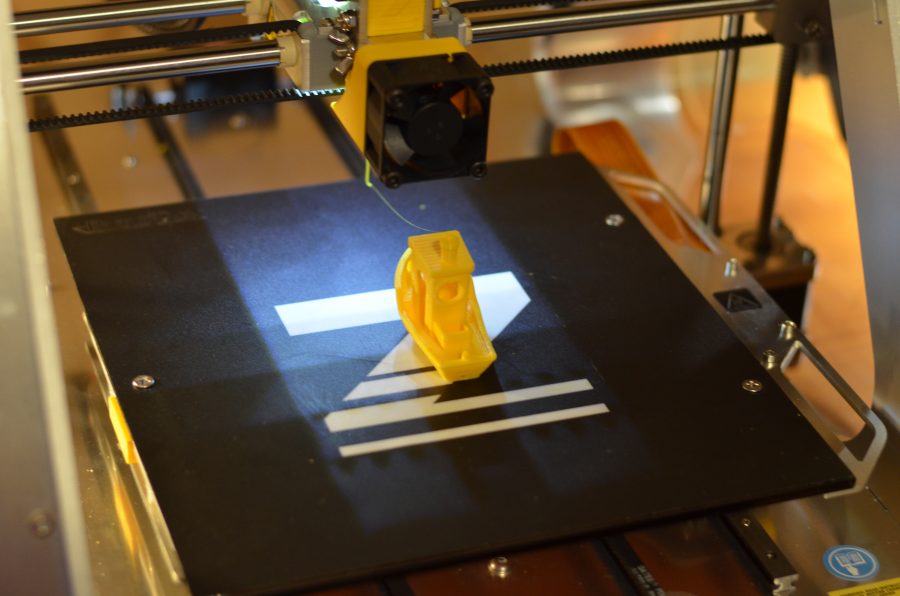
For this test, I decided to try the famous #3DBenchy torture test. The file is available just about everywhere, but I got this STL file from Designfutures.
I then generated the GCODE, which of course is what will precisely carry out the print instructions. Of the three Play options in the gcode display tab, Save to external SD card, Send to printer via USB, and Print from Voxelizer, I of course chose the latter.
Unfortunately, I’m sure there are more steps I needed to do to get it working correctly, including pre-heating from the software and other settings to home the unit, so I aborted the operation before it caused any damage to the print bed. Instead, I chose to send the file over USB, which is still valid for this test.
Once the file was fully transferred, it was selectable from the printer’s internal memory just like the astronaut. Unfortunately, when I tried to print, the print head was going too hard into the build platform, so I aborted. I then started a new calibration process.
Perhaps the leveling got knocked off when trying to print directly from the Voxelizer software, or perhaps it was for some other reason, but running the calibration revealed that indeed it was out of whack, if only by less than 30 degree on the thumb screw. Unfortunately, subsequent checks revealed far more misalignment with that thumb screw, so I again had to go through multiple iterations of frustrating and time consuming calibration. There must be something with my thumb screw, because this certainly does not seem normal!
Investigating the thumb screw further, the shaft is definitely bent, which certainly explains the results from the beginning with it not being able to calibrate most of the time. I went to The Home Depot to get an equivalent thumb screw, but they only had regular Socket Cap Screws in the Metric M4-0.7 x 25MM variety, which is right in every way except for the top part, which doesn’t allow it enough height. Being metric, I’m probably out of luck outside of ordering from online someplace like Amazon.
Since I had no other choice, I used pliers, my foot, and my garage floor to try and bend the shaft of the thumb screw a little straighter. The best I could do was get it just a little straighter, but that appears to have been enough to get me to where I needed after a dozen or so more tries, which may be tied to whether or not the thumb screw grips the shaft correctly and turns the way it’s supposed to.
Unfortunately, it turned out that the printer simply wouldn’t stay calibrated anymore, so I was unable to print further. Time to contact technical support.
Troubleshooting
After describing the situation over email, I was instructed that I could be sent a replacement thumb screw or purchase this one on Amazon. Since it would be a bit of a wait to receive a replacement all the way from Poland to here in the US, I decided to overnight the suggested part from Amazon.
After it arrived, I wanted to install the recommended Buildtak first, which is apparently good for hundreds of prints before needing replacement. I took it out of the package and it was already pre-cut for the platform. The catch is that I had to remove the print bed to attach it. Unfortunately, the three screws are held in with a washer and spring, so of course all fell out once I removed the bed. I applied the Buildtak as best as I could (not 100% smooth, but no doubt close enough) and then struggled, but succeeded, in getting the three screws back on with their associated washers and springs.
I fit the new thumb screw and then started the leveling process again. As expected for a complete reassembly, the calibration numbers were way off, so that required multiple runs. Nevertheless, I eventually got it, although my hope that it would take fewer than a dozen runs or so was for naught. A good thing though was the fact that the readings held up reasonably well between successive runs of the calibration sequence, so that was certainly a positive sign.
I was also informed that for optimal PLA prints, I should remove both covers and attach both included fans from the toolbox. Apparently the fans are automatically used by the printer when needed. Again, I would have liked all of this specified in the version of instructions I was reading, but that’s OK for now. Anyway, there’s a front and back fan, and, just like the touch probe, they attach magnetically to the print head (the arrows on each fan will help you orientate them if confused).
I went in for another astronaut print, now hopeful that I’ll get a result matching the included test print.
This time I got a perfect astronaut print. In fact, I’d say it’s even better than the included reference model! Unfortunately, it stuck to the Buildtak something fierce and was extremely difficult to remove (forcing me to do another quick calibration afterwards to make sure everything was back where it should be; this time it only took a few tries to calibrate). I also had a lot of trouble peeling the raft off. So, obviously there are still a few more tips or tricks I need. At the very least, though, I’m happy that it’s printing exactly as I expected it to.
For the heck of it, I printed yet another astronaut. This one was a bit easier to get off the build platform and a bit easier to pull off the raft. Unfortunately, a little bit of raft was still left on, and, unlike the first print, it looked like one single layer didn’t quite print perfectly (but it was still close).
Now, it was time for me to try the #3DBenchy print again.
That is definitely a pretty good #3DBenchy, particularly in comparison to the official prints (examples here). Now the only last bit is to see about getting the prints to stick a little less firmly to the bed. It was suggested that I turn the z-axis thumb screw 1/8th of a turn in the up direction (left), then in Settings, choose Move Axes. Once in Move Axes, select the Home icon and home all the axes automatically (each one manually is also an option). Apparently no touch probes or turning of the screws was needed here.
I did that, but still need to experiment a bit more with the process, because my prints and rafts were still stuck on rather aggressively. Apparently that’s a known issue with Buildtak, so I’ll just have to work on the right combination of post calibration z-axis adjustment.
Optimal Setup and Final Results
Based on tech support’s suggestions and my own confirmation, here is what appears to be the optimal way to setup the printer for PLA printing:
- Update the firmware via the Voxelizer software before you do your first print.
- Remove both covers for best ventilation. The covers should only be on when printing with ABS.
- Level your bed with the touch probe prior to your first print.
- Attach both fans included in the toolbox (they attach magnetically like the touch probe). They’re used automatically by the machine when needed.
- Apply the included Buildtak (or, optionally, ABS juice) to the print surface for all prints, even PLA.
- Whenever the prints stick too firmly to the bed, you can spray a little window cleaner between the raft and the table, and the model should be easier to remove.
- If your prints are still sticking too firmly to the Buildtak or glass build plate, adjust the thumb screw 1/8th of a turn in the up direction (left), then in Settings, choose Move Axes. Once in Move Axes, select the Home icon and home all the axes automatically (each one manually is also an option).
Naturally, I would have preferred to know all of that right off the bat, but, as a technical writer in my day job involving sophisticated hardware myself, with machinery like this, I can understand the difficulty in maintaining good documentation. In fact, I did notice some updates to the online documentation already even as I was writing this, so presumably they’ll keep making improvements based on user feedback. That’s a good thing.
Conclusion
While I’m going to keep the tradition of ending the review with Pluses and Minuses, keep in mind that this is just the first of a series of reviews on this printer. As such, it’s hard to draw truly definitive conclusions. I think the bottom line is that this is not a beginner friendly machine, which the price already reflects. If you don’t mind getting your hands dirty and doing some troubleshooting when needed, then this is certainly a viable option. The good thing is that the printer’s semi-open design lends itself to user repairs when needed.
It’s also important to note that there are no other alternatives that I know of in this price range that support the number of functions this supports, and certainly the more expensive individual options are generally no easier to work with. Either way, with a machine of this caliber and with 3D printing in general, there’s going to be a learning curve. That’s true of $200 machines, and that’s certainly true of machines costing thousands of dollars like this one.
Of course, I’m still excited to try all the other functions, as this type of 3D printing is child’s play for just about any other printer (although not necessarily with the same versatility or at the same quality level). I do think the effort put into this relatively simpler task will pay off for what will likely be far more demanding tasks. And I certainly appreciate the learning experience. As only the third 3D printer I’ve spent significant time with, I can say that my knowledge (and even appreciation) of the technology has grown substantially. That alone is worth the price of admission.
Pluses:
- Heated glass bed and configurable housing to work with a wide variety of materials
- Fast print speeds
- Excellent print quality
- Informative touchscreen interface
- Comes with almost everything needed for optimal 3D printing and then some
- Can do a whole lot more than just 3D printing!
- Good technical support
Minuses:
- Not beginner friendly
- Mediocre online documentation in parts
- Loading and feeding filament could be better (I’m not a fan of the way the spool holder works either)
- Unsure of where exactly the PTFE guide should go when the covers are on
- Bed leveling process is not fully automated and can be time consuming; it’s also not necessarily consistent between successive runs
- A bit noisy in its standard mode
- Expensive if you’re going to use this solely for 3D printing


 Your total news and information resource for all things Science, Technology, Engineering / Mathematics, Art, and Medicine / Health.
Leave a Comment