This is part four of my attempt to build the original Kickstarter version of the Pimorini Picade (Maxi version). Part three is here.
As we left off, I was going to hook up the Raspberry Pi 2 Model B and get RetroPie on a microSD card and go from there. For those following along, I’ll be mostly trying the directions here, here, and especially here.

Hooking it all up.
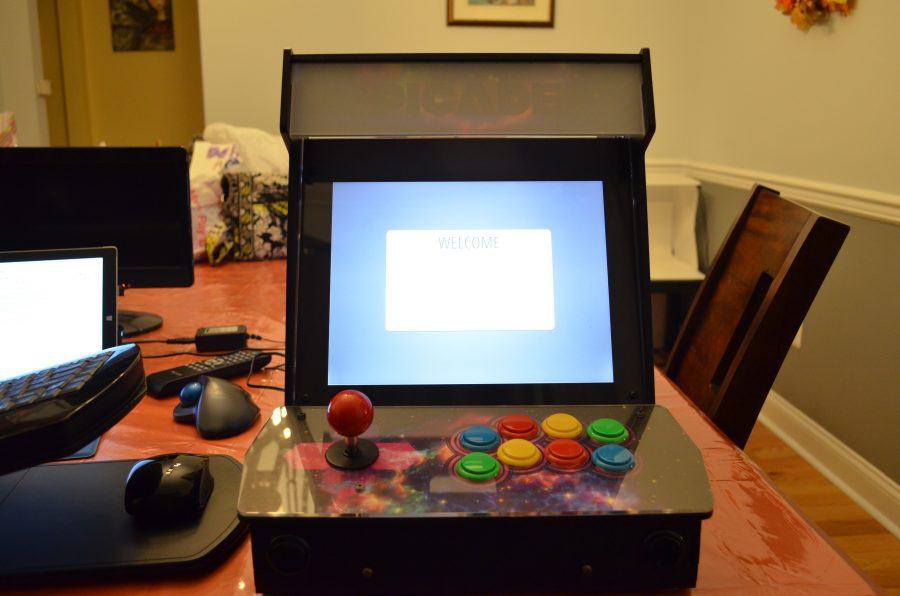
I plugged the Raspberry Pi into the Picade’s USB, audio, and HDMI outputs. I then plugged the power into both the Picade and Rasberry Pi. I also plugged the Phantom Lapboard‘s dongle into another USB port on the Raspberry Pi in order to use its mouse and keyboard for setup.
Now, it’s time to power it all on and see how I did.
And… it didn’t detect the Pi. I troubleshot the issue by bringing out another monitor with a different HDMI cable. I got a signal on that. So I used that other HDMI cable to connect to the Picade, which did work. I then put the included short HDMI cable back in, making sure it was pushed in better on both ends.

By some miracle, all of my wiring worked.
Now I just had to follow the RetroPie prompts to set up my control panel.

The display is quite nice.
I went into the RetroPie setup and configured the audio to go through the headphone jack. Both speakers work fine, but there is a low level hiss, which is apparently common with sound through the Pi’s headphone jack. When there’s sound, it’s not that noticeable, but it is something I’ll have to figure out how to adjust at some point.
There’s not much pre-installed other than the emulators on RetroPie (this is of course using the EmulationStation front end), but it does have a small selection of “ports” and other games that aren’t particularly interesting to me in this type of arcade-style setup.

EmulationStation is the front end.

Included Ports, short and sweet.

Duke Nukem 3D is cool, but not something I really want to play on this type of setup.
That was good enough for testing, but I really want this mostly for arcade games.
I had to first create a retropie directory on a USB stick and then put it in the Pi. Once it finished blinking, I had to take it to my desktop computer and put the appropriate ROM files in the newly created directories for what looked like a really nice range of emulators. I started out with personal favorites, Pooyan and Satan’s Hollow, I threw the Super NES version of Donkey Kong Country on there for good measure.
I pressed F4 on my keyboard and let it reboot itself. Sure enough, I got a Super Nintendo emulator to appear, as I did the three different versions of MAME that it supports (I copied the two ROM files to each MAME directory, not being sure which version was going to perform best).

There are three MAME options.

Selecting what to play.

Of course I’m going to test with Pooyan.
So obviously that works fine, although I do want to remove image stretching on MAME. I’d much rather have a smaller visible screen and the games the correct aspect ratio. Unfortunately, that’s one of the tricky things about this Picade setup. There is no dedicated Escape or other, similar, key, so I’m kind of flying blind without also using a USB keyboard (luckily I have one hooked up; I guess I’ll dedicate the Phantom Lapboard to this system since it has a dongle that seems to work for both its keyboard and mouse). Even with the USB keyboard, I wasn’t able to figure out how to exit out of MAME.
Upon rebooting, I selected the third MAME version, and sure enough, that one displays the screen the way that I want it. The right pinball button on my cabinet even allowed me to exit back to the master RetroPie menu!

Pooyan the way it’s supposed to look.
The first MAME option works well too, although like the third MAME is a bit heavy on the graphics filtering.

Satan’s Hollow puts the sound on this system through its paces.
In any case, the controls are pretty responsive and I have no major complaints with the emulation, as you’d expect from the latest, most powerful Raspberry Pi available at the moment. As is usual with these things, the setup is going to be a long process. With that said, I’m happy that it works and I’ll be of course be setting up a few key titles to be sure to play.
Unfortunately, there’s no dedicated on/off switch for the Pi, as the on/off switch on the side of the arcade cabinet only turns the monitor on or off. I can however do that from the software controls, so it’s not too bad, but I’d still like a dedicated switch.
Since everything was working, I decided one last time to try and figure out the issue with the marquee. I took it off, and sure enough, there was still a plastic protector on each piece of the plexiglass. I don’t know how I missed that. The good news is, now it really does look the way it’s supposed to.

The marquee is fixed!
So now the only thing left is to properly mount the Raspberry Pi on the back of the door. Unfortunately, I couldn’t figure a satisfactory way of doing that with the included holes and screws, so if I can find ones that fit, I’m just going to order PCB Mounting Adhesive Standoffs and place it roughly where I have it now.

It really should be mounted on the door, but it’s easier this way.
Actually, after I wrote that, I did find one adhesive standoff in the leftover Picade parts, so I used that to secure the Raspberry Pi to the bottom of the cabinet. It seems to work well and just having the one allows me to manipulate the PCB when necessary.

It would have been nice if both the Raspberry Pi and Picade could be powered together, rather than separately. That will have to be something to look into for the future.
So, to sum up, if you have sufficient patience, this is a relatively easy build. There were several areas where I struggled mightily, but it was obviously never anything insurmountable. While I would have preferred a fully pre-configured SD card dedicated to MAME, the available RetroPie image gets most of the job done. With the marquee issue resolved, my only real beef is with the sound output. When there’s something playing, it sounds fine and you can set it in software to be quite loud. However, the audible hiss when nothing is happening is not that nice. I’m not sure if I’m ever going to bother fixing that, however.
Interestingly, just like before, after I wrote that, I decided to investigate a possible fix for the audio hiss. The answer was found here. Editing the config.txt file (just like the days of MS-DOS for me), I added the line disable_audio_dither=1 to the end of the file. It fixed the issue. There might still be some minor hissing when certain sounds are actually playing, but not when it isn’t playing, which is what really matters.
I also don’t like the idea that I have to set the volume level via software. I’d much rather have a dedicated dial or buttons. The side buttons on the monitor (that pass through the case side nicely) control the volume, but I’m not using the monitor for sound. If possible, I may try to figure a way to use the case speakers like I do now, but have it be controlled via those buttons. Who knows, though?
My long-term goal is to perfect a MAME setup on this. I casually installed a few more MAME game ROMS, and some worked, while others didn’t (and I also have to figure out how to install sound samples, since I assume that’s not an automated process; at least there’s no specific folder, so it may require some copying somehow using the File Manager). I’m going to experiment with the other version of MAME (the other one that defaults to the correct aspect ratio) and see if that improves things, as well as look for a full ROM set (although I’m not really sure I want to wade through a whole lot of cruft, so I may just install on demand). I also would like to figure out how to disable display of some of the other emulators on there, at least until I decide to make use of them. Again, time will tell. Anyway, for now, I’m pretty happy with how this went and will certainly consider similar time consuming, but gratifying projects in the future.
Read the rest of the series:


 Your total news and information resource for all things Science, Technology, Engineering / Mathematics, Art, and Medicine / Health.
Leave a Comment