• Home
  • Our Books
  • Our Film
  • Games
  • About Us
  • Contact Us
  • Login

Perspectives on all eras of videogames, computers, technology, and pop culture since 2003

Login

Login
Armchair ArcadeArmchair Arcade
  • Home
  • Our Books
  • Our Film
  • Games
  • About Us
  • Contact Us
  • Login

Review: Laser Toolhead for the ZMorph 2.0 SX

Laser Toolhead for the ZMorph 2.0 SX (Voxelizer software)

Review: Laser Toolhead for the ZMorph 2.0 SX

October 31, 2016 Posted by Bill Loguidice Review No Comments

Although I stated that my next review segment would be on the Dual Pro 3D printing head of the ZMorph 2.0 SX, I’ve had to take a detour due to a technical issue that can only be resolved through a replacement part. Instead of waiting for said part, I decided to move onto the laser toolhead, which technical support said should not be dependent upon the faulty component. On a related note, interestingly, although the supplied Dark Blue PLA filament worked for several tests, it eventually became too slippery to use. I confirmed this by trying to use it on another 3D printer I have. It’s a very strange defect.

This is a preview of the Dual Pro's 3D printing capabilities. It's a pity I can't finish that portion of the review for now.

This is a preview of the Dual Pro’s 3D printing capabilities. It’s a pity I can’t finish that portion of the review for now.

Anyway, after my prior first look, unboxing, initial setup, and extended review of basic 3D printing of the remarkably versatile ZMorph 2.0 SX Full Set, I’m now ready to tackle a review of the laser toolhead option, which allows not only for engraving various materials like wood, leather, and plexiglass, but also for cutting various materials like PVA foil, paper, and cardboard.

Getting Started

To start, I followed these instructions in the Knowledge Base. Note that I had trouble removing the toolheads unless, based on the suggestion from tech support, that I also loosen the screw above the screw with the butterfly nut that needs to be removed. Once that was loosened, the toolheads came right out.

Per the instructions, I installed the laser toolhead, although I wasn’t quite sure where to put the breakout box (for now, I have it on the top of the unit). I also installed the included plywood table in place of the glass printing bed for extra safety (no chance of laser reflections for one). That was easy thanks to the magnet-based system.

The laser toolhead and plywood table installed.

The laser toolhead and plywood table installed.

With installation out of the way, I proceeded to place the material I wanted to engrave, which for the first test, was a piece of cardboard. Instead of using double-sided tape, I decided to use some Blu-Tack to secure the cardboard to the plywood table. I decided to try the built-in Burn Calibration Pattern test after doing the ominous sounding “arm laser.”

(By the way, don’t forget to review the safety and materials guidelines!)

As is par for the course at this point, I forgot a few things and the Knowledge Base didn’t necessarily make it clear. First off, I forgot to attach the front and rear fans to the laser toolhead, although I’m not sure they’re necessarily needed (or even used). Second, the piece of cardboard I used was both too small for that test and too thin, which scorched some of the plywood table. I addressed both issues.

Calibration appeared successful.

Calibration appeared successful.

One thing I’ll note is that this laser engraving/cutting process creates really smelly fumes, so definitely have some fans and good ventilation.

Initial Test Runs

For the first real test print, I flipped my cardboard over and ran the laser_placing.gcode file that’s built into the printer. That created a pattern similar to what’s on the plywood table.

Result of running the laser placing gcode.

Result of running the laser placing gcode.

The next print was ZMorph_engraving.gcode, which was the one other file built into the printer. I just let it engrave over the laser placing pattern.

Result of running the ZMorph engraving gcode.

Result of running the ZMorph engraving gcode.

Now it’s time to move onto using the Voxelizer software.

Voxelizer Runs

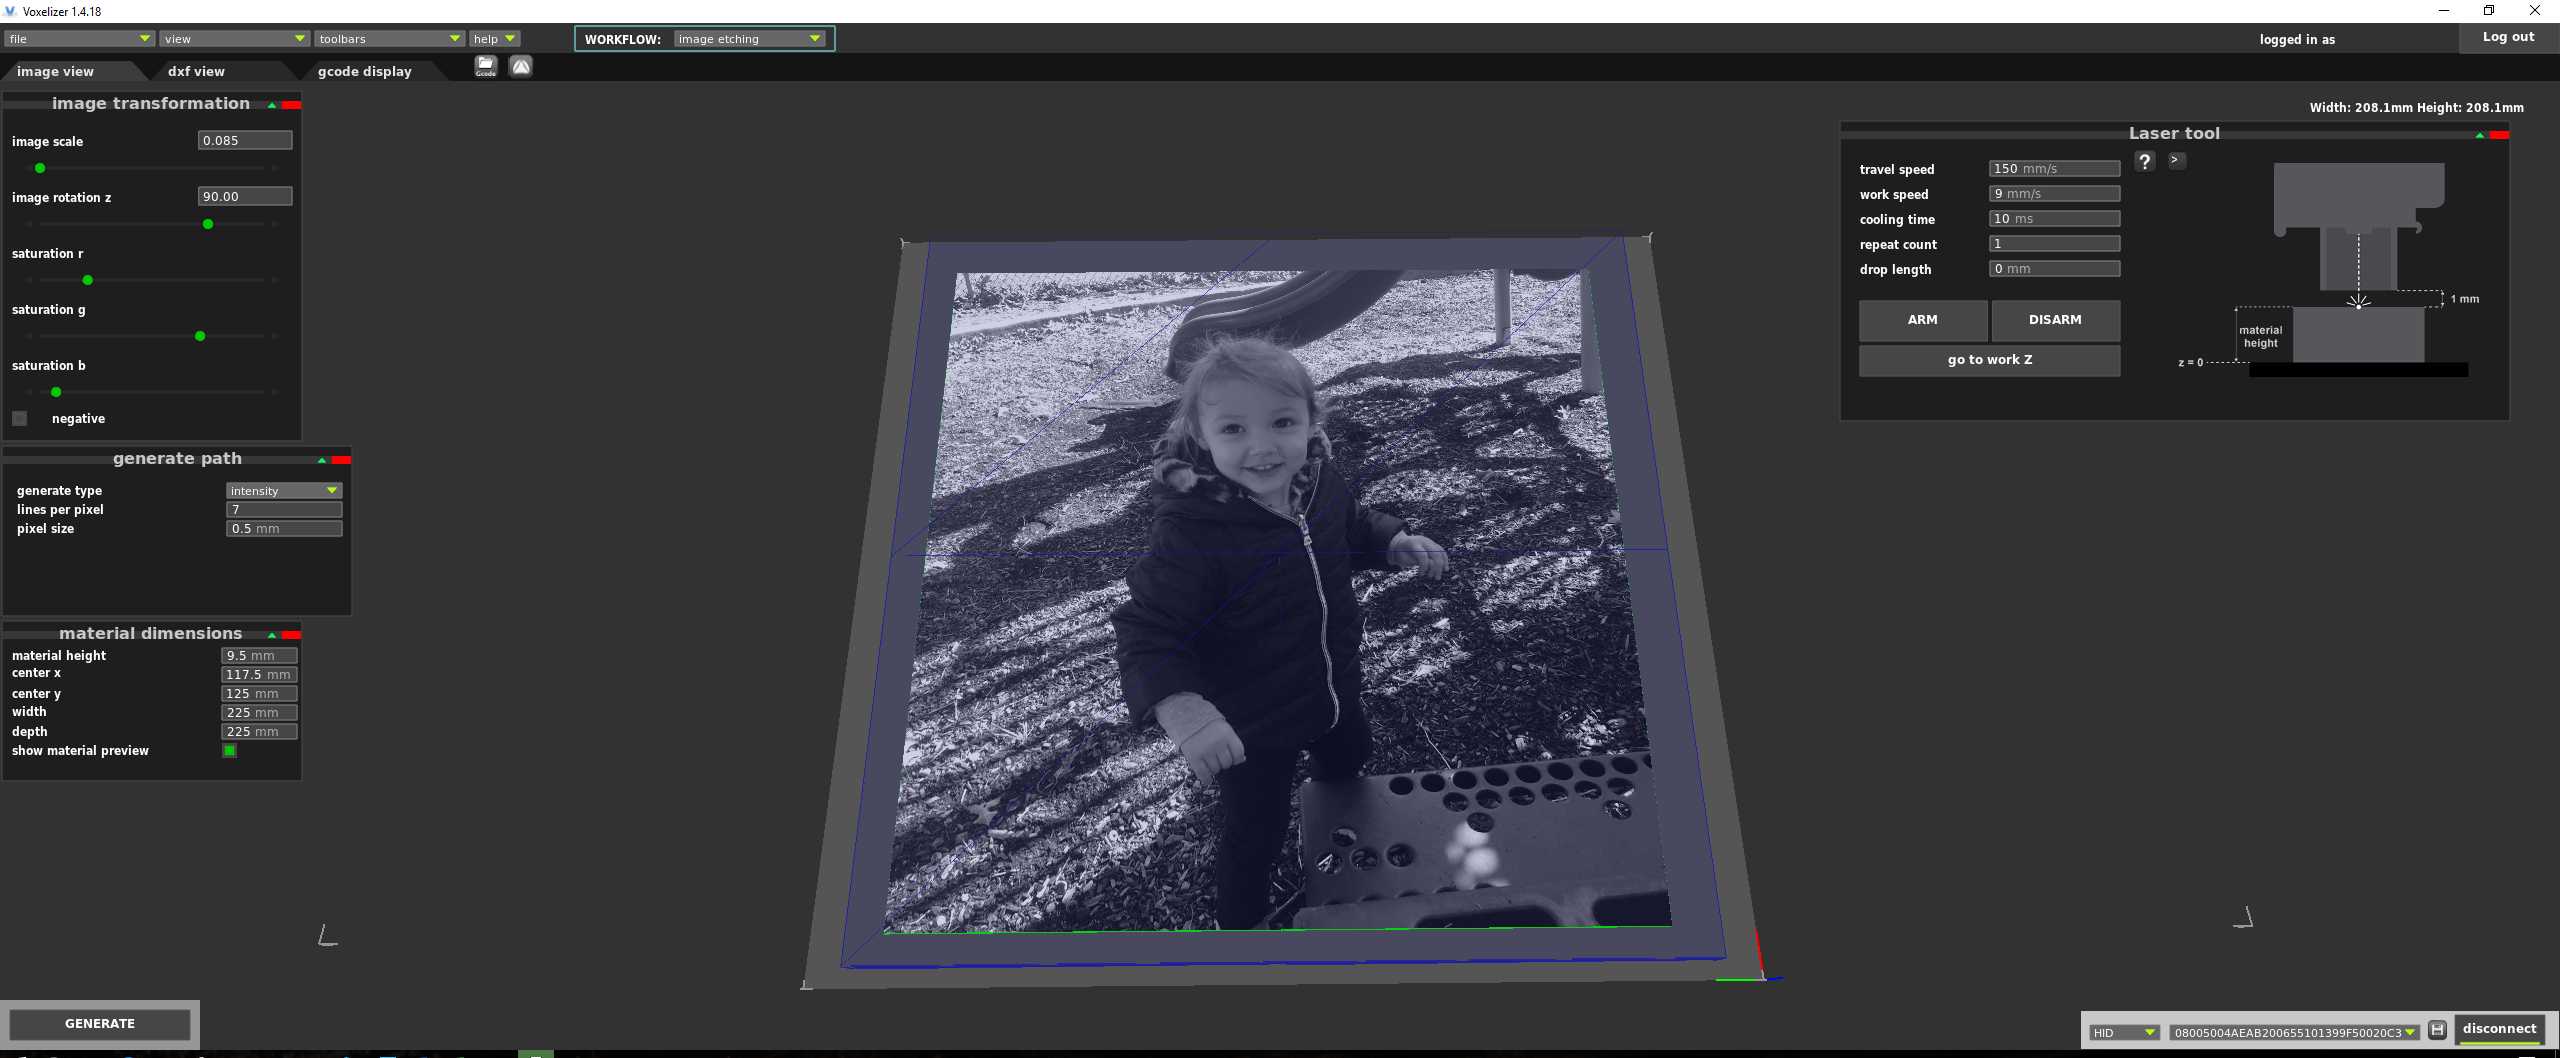
There are two laser workflow options in Voxelizer that I’m aware of, and that’s image etching and laser cutting. First, I wanted to try image etching. The tutorial here was my guide, although I used my own image and material.

The image and settings for the block of wood I used. We recently replaced our fence, and this was some leftover material.

The image and settings for the block of wood I used. We recently replaced our fence, and this was some leftover material.

Additional settings as I print directly from Voxelizer over USB.

Additional settings as I print directly from Voxelizer over USB.

The software was rather confusing. It took several tries to get the Z axis set correctly, and even then for this run I set it way too high.

The @zmorph3d laser toolhead in action. I still have more settings to perfect, but early results are promising. #make #making #laser

A video posted by Bill Loguidice (@bill_loguidice) on Oct 29, 2016 at 9:40am PDT

It still worked, but not quite as well if I set it perfectly. This could definitely use more of a step-by-step tutorial. Nevertheless, this is something that with some additional experimentation, I think I could more or less perfect. As a result, I decided to abort laser etching the wood for now and experiment more with the cardboard.

I loaded up the same image and worked out how to set the work Z stop more or less correctly. The other settings, like work speed, I set with my best estimate based on the material.

The image view settings.

The image view settings.

The dxf view settings.

The dxf view settings.

The gcode display of the in-progress print.

The gcode display of the in-progress print.


An oversized laser engraving experiment with the @zmorph3d ZMorph 2.0 SX printer. #make #making #laser

A video posted by Bill Loguidice (@bill_loguidice) on Oct 29, 2016 at 6:35pm PDT

The end result.

The end result.

As you can see from the photo of the end result, it came out decent for my first real laser etching. I think with more tweaks (particularly to things like depth) and more interesting material, the results would be even better.

Now it was time to try some simple laser cutting.

Unfortunately, although the tests that follow were successful, I still wasn’t quite sure how to control the laser’s depth, which I eventually figured out was related to the work speed of the laser, which you’ll see in the later screenshots (I thought travel speed might also be a factor, but slowing that down resulted in a lighter burn line). So, instead of cutting, the first few passes were more top layer etching (marking), while the later passes were more in line with what it was supposed to do, although still nothing like cutting.

Trying some text editing and placement.

Trying some text editing and placement.

You can read more about text engraving here.

The end result.

The end result.

Next, I tried some files from the laser cut stickers article, although I stuck with the cardboard as the target.

In progress cat.

In progress cat.

The end result. Too light.

The end result. Too light.

Another one.

Another one.

The end result. Better (and note the interim test to the right).

The end result. Better (and note the interim test to the right).

Conclusion

As before with the 3D printing, this was not exactly smooth sailing. It’s a simultaneously frustrating and exciting process, with a fairly dramatic learning curve the more you want to take advantage of all of the features and troubleshoot and eliminate all of the issues that crop up. Once that time consuming stress is out of the way, though, it is pretty awesome. I definitely would want more time to work on truly understanding the settings, though, as this is not necessarily a straightforward learning process. I’d also want to develop some type of ventilation system, because laser etching and engraving really does generate a lot of fumes from the process, something akin to a strong wood burning fireplace.

I’m going to end with the usual Pluses and Minuses, but again, this is just one of a series of reviews on this printer, so I only consider those a reflection of this single function of many. Next up is the CNC routing functionality!

Pluses:

  • The basics are relatively straightforward
  • Good design for the toolhead maximizes safety


Minuses:

  • Fumes! (understandable, but wow, they’re intense)
  • Mediocre documentation results in a high learning curve with lots of trial and error
  • Did I mention the fumes? It’s the smell of smoke and burning, kind of like when you’re standing outside and someone has a wood burning fireplace going.


Related

Tags: 3d printer3d printingcncengravinglasermakemakermakingroutersubtractivetoolheadvoxelizerzmorphzmorph 2.0 sx
No Comments
Share

About Bill Loguidice

Bill Loguidice is a Founder and Managing Director for Armchair Arcade, as well as a critically acclaimed technology author and journalist.  He is also the co-founder of creative services firm, Armchair Creative Services, and a noted videogame and computer historian and subject matter expert. See full bio

You also might be interested in

3D MARS Wood-infused PLA 3D Printing Filament

Review: 3D MARS Wood-infused PLA 3D Printing Filament

Aug 16, 2017

In my continuing quest for unique, high quality PLA 3D[...]

Stronghero3D FDM 3d printer filament PLA Multicolors Gradient

Review: Stronghero3D FDM 3d printer filament PLA Multicolors Gradient

Jul 25, 2017

It’s difficult for a company to distinguish their 3D printing[...]

The Humble Book Bundle: Mad Scientist by Make:

Pay what you want for The Humble Book Bundle: Mad Scientist by Make:

Mar 7, 2018

The Humble Book Bundle: Mad Scientist by Make: Here’s the[...]

Leave a CommentCancel reply

This site uses Akismet to reduce spam. Learn how your comment data is processed.

Recent Posts

  • How has gaming evolved across the last decade and what is next?
  • Polymega Collections Volumes 9 and 10 now available – Strikers 1945, Bases Loaded, and more!
  • How The Legacy Of League Of Legends Paved The Way For eSports Betting
  • Tech Meets Design: What Is a Flexible Monitor and Why Gamers Should Care
  • Application of Strategic Thinking in Nomini Casino Games
  • DXRACER Partners with CS2 MESA Nomadic Masters Spring 2025 to Elevate Esports Comfort and Performance
  • Playing the Long Game: A Simple Guide to Casino Money Sense
  • Best Games to Bet on This Season
  • Retro Gamers, Modern Thrills: Why Instant Withdrawal Casinos Resonate with Arcade Fans
  • Pixels and Progress: How Retro Gaming Continues to Shape Modern Technology

Recent Comments

  • Aiodensghost on Official Game List for My Arcade Atari Gamestation Pro
  • keyboredom on Quick guide on how to play on the Internet Arcade
  • Bill Loguidice on Official Game List for My Arcade Atari Gamestation Pro
  • Melanie Levenstein on Official Game List for My Arcade Atari Gamestation Pro
  • George on How to Predict CS:GO/CS2 Skins Prices?
  • Bill Loguidice on Retro Games Ltd to release The Spectrum, fully working ZX Spectrum, and here’s the game list!
  • Derek on Retro Games Ltd to release The Spectrum, fully working ZX Spectrum, and here’s the game list!
  • Bill Loguidice on Retro Games Ltd to release The Spectrum, fully working ZX Spectrum, and here’s the game list!
  • Simon on Retro Games Ltd to release The Spectrum, fully working ZX Spectrum, and here’s the game list!
  • Viktor Špička on Retro Games Ltd to release The Spectrum, fully working ZX Spectrum, and here’s the game list!

Archives

Categories

Explore

android (46) apple (37) ar (37) Arcade (165) Atari (73) atgames (173) book (99) books (98) casino (496) esports (46) firmware (43) Flashback (45) gambling (520) Gaming (40) home arcade (114) htc vive (42) humble bundle (282) humble store (67) ios (37) led (35) legends (40) legends arcade family (46) legends gamer (33) legends pinball (39) legends ultimate (71) Microsoft (40) Nintendo (70) pc gamer (65) pc gaming (52) pinball (43) playstation (55) PS4 (36) retro (34) Sega (38) slots (82) sony (51) steam (145) switch (33) technology (35) update (42) virtual pinball (36) virtual reality (116) vive (34) viveport (42) vr (121)

Affiliates

+ Amazon

The everything store

+ Humble Bundle

Game deals, including name your price bundles

+ Playasia (Play-Asia.com)

Import games and collectibles

+ DJI Store

Amazing drones and related technology

+ Razer

Amazing PC gamer products!

fullSTEAMahead365 Your total news and information resource for all things Science, Technology, Engineering / Mathematics, Art, and Medicine / Health.

Human Advancement Never Stops.

Key Site Statistics

Posts published: 2,533
Latest publish date: May 6, 2025 @ 3:42 pm
Registered user count: 99,026

Contact Us

If you have a question, would like to provide feedback, or otherwise wish to get in touch with us, use this form.

Send Message

Blog Posts by Date

October 2016
M T W T F S S
 12
3456789
10111213141516
17181920212223
24252627282930
31  
« Sep   Nov »

Social Media and RSS

Support Armchair Arcade

All editorial content © 2003 - 2025 Armchair Arcade, Inc., an Armchair Creative Services, LLC, property. All rights reserved unless otherwise indicated. All trademarks and copyrights are retained by their respective owners. No content is to be removed or reused from the Armchair Arcade Website for commercial purposes without explicit permission from the principal Armchair Arcade staff, or the original trademark or copyright holders. Armchair Arcade, Inc., is not responsible for the content of any external sources or links. Further, endorsement of any external sources or links is neither implied nor suggested.

We thank you for your support and encourage you to contact us for any reason, including, but not limited to, questions, concerns, business endeavors, or praise. Especially praise.

Armchair Creative Services, LLC, may earn compensation for sales from links on posts through affiliate and other programs. Editorial rigor and objectivity standards are strictly adhered to and any compensation has no effect on coverage or opinions.

Prev Next